Barcode Epidemic: Difference between revisions
| Line 66: | Line 66: | ||
==== First-time Setup ==== | ==== First-time Setup ==== | ||
* Open any browser and go to ''127.0.0.1:9999''. You should get the Abyss First-time Configuration page. Choose your Language (I'll be describing English!). Then choose a user and password, which is specific to managing Abyss. Make a note of it, although you won't need it much. | * Open any browser and go to ''127.0.0.1:9999''. You should get the Abyss First-time Configuration page. Choose your Language (I'll be describing English!). Then choose a user and password, which is specific to managing Abyss. Make a note of it, although you won't need it much. | ||
* On '''Mac:''' | * On '''Mac:''' - At this point for me, Safari got its knickers in a twist and I had to manually restart it. If it brings up a login screen, carry on, but if it seems to not do anything, then restart Safari and browse to ''127.0.0.1:9999'' again. | ||
* Your browser should now be asking you for the user/password you just chose. If you get it right, you'll get to the Web Server config page, and see a bunch of icons. | * Your browser should now be asking you for the user/password you just chose. If you get it right, you'll get to the Web Server config page, and see a bunch of icons. | ||
==== Configure for PHP ==== | ==== Configure for PHP ==== | ||
* In the middle, you'll see "Default Host Running on Port 80." Click ''Configure'' next to it, and then ''Scripting Parameters''. Ensure ''Enable Scripts Execution'' is ticked, and ''Type'' is set to standard. Then under Interpreters, click ''Add'', set Interface to ''FastCGI (Local - Pipes)'', and for Interpreter, you need to locate a file "php-cgi" - where you installed PHP. For '''Windows''', something like ''C:\Abyss\PHP5\php-cgi.exe'', for '''Mac''': ''/Applications/PHP5/bin/php-cgi''. | * In the middle, you'll see "Default Host Running on Port 80." Click ''Configure'' next to it, and then ''Scripting Parameters''. Ensure ''Enable Scripts Execution'' is ticked, and ''Type'' is set to standard. Then under Interpreters, click ''Add'', set Interface to ''FastCGI (Local - Pipes)'', and for Interpreter, you need to locate a file "php-cgi" - where you installed PHP. For '''Windows''', something like ''C:\Abyss\PHP5\php-cgi.exe'', for '''Mac''': ''/Applications/PHP5/bin/php-cgi''. | ||
Revision as of 21:45, 15 December 2016
Work in Progress!
Playing the Game
Getting Started
Usually, everything will have already been set up. So to get everything working, the sequence of events will normally be along these lines:-
- Plug in the router and switch it on.
- Plug in the laptop (server) and switch it on.
- Plug in projector/tv screen, and connect laptop to it.
- Test that in advance of any public event.
- Not all TVs are friendly. Check the notes about the laptop you're planning to use - whether it has a DisplayPort (HP), HDMI port (Lenovo and others), or a VGA port (almost everything). Check carefully you have the right cable as they are similar! And verify that what you're plugging the cable into supports it and works...
- Check that laptop is joined to mrc_outbreaks network.
- Double click on Live Epidemic on the laptop
- Turn some tablets on. Check they join mrc_outbreaks network.
- Start scanning barcodes.
How The Game Works
- The game works in social events of maybe 30+ people, in a well bounded arena, with a big screen.
- Start it by giving one or two people in the crowd a barcode. (Seed infections).
- Tell them to go to "infection control" - the people with the tablets.
- The victim sees the infection controller and presents the barcode.
- We have run two variations of this game; one of the following will apply:-
- The infection controller asks whether the victim is a member of the department, or a visitor. Later on, we look at the graphs to see whether infections spread differently within the two groups, or between them.
- Alternatively, at the Centenary event, we allowed a vaccination probability, giving the victim immunity, and causing them to make no further contacts. The immunity would either be pre-defined (in which case the victim would know already), or their status could be determined by pointing the tablet mysteriously at them and pushing a button.
- The infection controller scans their barcode, then destroys it.
- The tablet tells the infection controller how many infections they should make.
- The infection controller scans a barcode for each of those new infections, and gives it to the victim.
- The victim is told to spread these infections to whoever they want. Tell each new victim to visit "infection control".
- The victim is told they are now immune to further infections. However, it's most fun to keep this fact secret.
- If the victim is given any more barcodes, they must accept them, but they shouldn't visit infection control again.
- Graphs and movies of the current epidemic will be shown in bright colours somewhere in the room.
The Parameters
- The tablets communicate with a web server; the dynamics of the epidemic can therefore be changed on-the-fly, without the infection controllers knowing about it.
- If appropriate for the game being played, the vaccination probability can be set.
- The number of contacts is assumed to be poisson distributed around a specified mean.
- However, in practise, we want to truncate the tail quite tightly, so there is a ceiling parameter.
- And in some cases, we wanted to ensure people made at least one contact, so there is a floor parameter too.
- These can be set by browsing to http://192.168.2.2/epi when connected to the mrc_outbreaks network.
Installation from Scratch
If something has gone wrong, or the Barcode Epidemic needs setting up on new equipment, then the following should be everything you need to know. I'll use the current equipment to describe the process; steps will differ with different equipment obviously, but the principles should still work!
The Web Server
We need to run a lightweight HTTP server that supports PHP. I like Abyss X1:- it's simple, very lightweight, and there are versions for all platforms. By all means, setup another web server if you prefer, but this one has served very well. Instructions below are for both Windows and Mac; if you use Linux, you'll probably figure out the very simple requirements. My instructions here are very simple - change locations to how you like if you're happy doing that.
Installing Web Server Software
Download Abyss
Download from here for your platform; Windows, Mac or Linux.
- On Windows:, I installed to C:\Abyss, for simplicity. I tell it to install as a Windows service, and have it start up automatically.
- On Mac:, - I mounted the installer, dragged the Abyss Web Server folder into my Applications folder, then tried to run the Abyss Web Server app from new folder I'd just dragged. It complained at me because it didn't come from the App Store, so I had to use Control+Click to run the app, and confirm I knew what I was doing. Also on running the Web Server, it asked me to confirm I wanted it to Activate ports below 1024 - to which I said Yes, to make it run like a normal web server. If you want the web server to start automatically when you turn your Mac on, then while the app is in focus, click on Server on the top menu, then Startup Configuration on the top menu bar, and choose the automatic startup option.
Download PHP
Aprelium provide convenient downloads for Windows and Mac here. PHP 5 is fine.
- On Windows: - I installed into C:\Abyss\PHP5.
- On Mac: - Again, I mounted the installer, and dragged the PHP5 folder into Applications.
First-time Setup
- Open any browser and go to 127.0.0.1:9999. You should get the Abyss First-time Configuration page. Choose your Language (I'll be describing English!). Then choose a user and password, which is specific to managing Abyss. Make a note of it, although you won't need it much.
- On Mac: - At this point for me, Safari got its knickers in a twist and I had to manually restart it. If it brings up a login screen, carry on, but if it seems to not do anything, then restart Safari and browse to 127.0.0.1:9999 again.
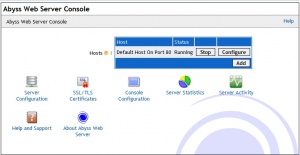
- Your browser should now be asking you for the user/password you just chose. If you get it right, you'll get to the Web Server config page, and see a bunch of icons.
Configure for PHP
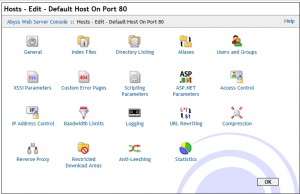
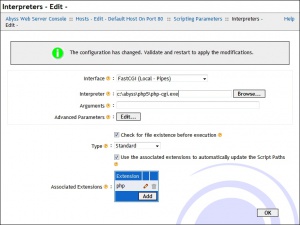
- In the middle, you'll see "Default Host Running on Port 80." Click Configure next to it, and then Scripting Parameters. Ensure Enable Scripts Execution is ticked, and Type is set to standard. Then under Interpreters, click Add, set Interface to FastCGI (Local - Pipes), and for Interpreter, you need to locate a file "php-cgi" - where you installed PHP. For Windows, something like C:\Abyss\PHP5\php-cgi.exe, for Mac: /Applications/PHP5/bin/php-cgi.
- Then in Associated Extension, click Add, and add the extension php. Click Ok, and Ok again.
- You should be back at the icons page. Go to Index Files, and add index.php. Ok, and ok again.
- And press the Restart button it is offering you. Wait a few seconds, and the config page will reappear. But you're all done now, so you can close it once it's done.
Setting up the Epi Website
- First, clear out the default website Abyss came with. If you everything as I did above, then on Windows it'll be in C:\Abyss\htdocs; on Mac: /Applications/Abyss Web Server/htdocs.
- So delete the files in that folder, and download the Epi Website here. Extract that zip file into the relevant folder; you should see a file index.php and a folder epi within the htdocs' folder.
- In that folder, edit the file epi/config.php - there is a two line section for Windows, and a two-line section for MAC. Simply delete, or comment (put // at the start of the line) the pair that you don't want. If you've chosen different folders, change the web_folder variable to point to the htdocs/epi folder we made.
- Also, if you did install into different folders, then edit clear.bat or clear.sh on Windows or Mac respectively, and change the folder at the top.
- Mac: - I'm a bit unsure of default permissions. It seems Ok in testing, but I don't understand why it's ok. So this may be unnecessary, but to be sure: in a Terminal window:
- cd /Applications/Abyss\ Web\ Server/htdocs/epi (push tab to auto-complete the path...)
- chmod 755 clear.sh
Router and Wireless Connectivity
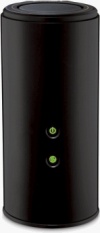
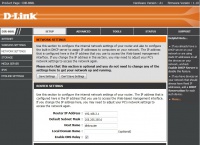
The Belkin has gone, the D-Link has come. The router is a D-Link DIR-868L, which works fine. Mostly, you'll just have to plug it in, and push the button on the back, and wait for the mrc_outbreaks wifi network to appear. The D-Link is already configured, so I won't describe that here; but all you need if you set this up on another router, is a wifi network, and to ensure that your web server always gets the same IP. I configured the D-Link so that tablets would get the set IP addresses too, although that shouldn't really matter.
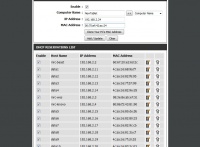
To add a server or tablet to the router's DHCP
- Connect to the mrc_outbreaks wifi, or attach to the router with a network cable.
- Browse to 192.168.2.1, and login with admin, and the secret password which you get by contacting Wes, or IT.
- Click on NETWORK SETTINGS on the left, and scroll down to ADD DHCP RESERVATION.
- Feed it a name, the IP address, and the MAC Address of the new machine. Don't know the MAC address?
- On Windows, open a Command Prompt, and ipconfig /all |more. It will list all your network connections - look for Physical Address for the right one.
- On Mac, open a Terminal Window, and ifconfig - look for the right network connection, and the MAC address starts with ether.
- On Android, Something like Apps, Settings, and under System, About Device, and Status. Look for Wi-Fi MAC address.
- Tick the enable box, and click the Add/Update button.
The tablet
- Test by taking a tablet.
- Join the mrc_outbreaks.
- Browse to 192.168.2.2 to test it.
- You need two extra apps. Pic2shop does the barcode scanning for us, and there's the Live Epidemic app itself.
- To install these apps, I'm going to assume you've installed the Android tools, and the hack for the HP tablets described here.
- Connect a single tablet at a time to the laptop. In a command window, change directory to where you put your Android Development Tools (eg, cd \Program Files\Android).
- Then cd sdk/platform-tools. Might be a good idea to copy any apk files you want to install into that folder.
- adb install app.apk (where app.apk is the path to the package you want to install - pic2shop.apk or liveepi.apk)
- The apps will install.
- You might need to tell the Live Epi app where the web server is. Click the "three dots" icon in the top left corner, and set the website to http://192.168.2.2/epi/
- Then scan a barcode. If it appears to work, then it probably does!
The Live Display App
- Finally, we need to install the graph plotter software for the big screen. Firstly, unzip the content into a folder called "C:\Cent". (The name is a legacy from the MRC Centenary events by the way).
- Pre-requesties:-
- You'll need a version of R installed. Add the statnet and animation packages in the normal way.
- Unzip the ndtv package into the library folder, inside your R installation.
- Install Java (JDK recommended) - any version 7 or later. Add the path to java.exe (C:\Program Files\Java\jdk1.8.0_05\bin) to the system path.
- Install PDFtk Server - a commandline set of tools for mangling PDFs. As part of the install, say yes, it should add the bin folder to the system path. #
- Install the dot matrix font, as the interface uses it to look, er, cool.
- Install GhostScript.
- Unzip the 64-bit VLC into C:\Program Files\VLC
- Remember to start a new command window after changing the system path!
- The Content
- Make a folder C:\Cent to put the content in - the name is a echo of the MRC Centenary events where all this began.
- Edit run_r.bat and mm.bat and check that the path to your R installation is correct.
