Troubleshooting: Difference between revisions
Jump to navigation
Jump to search
No edit summary |
mNo edit summary |
||
| (11 intermediate revisions by the same user not shown) | |||
| Line 6: | Line 6: | ||
== How to fix it and get Windows 10 activated again == | == How to fix it and get Windows 10 activated again == | ||
The fix is very simple if you follow these steps exactly. | The fix is very simple if you follow these steps exactly. | ||
[[File: | [[File:Activation.png|thumb]] | ||
# Connect to the | # Connect to the Imperial College VPN temporarily. https://www.imperial.ac.uk/admin-services/ict/self-service/connect-communicate/remote-access/virtual-private-network-vpn/ | ||
# Press your Windows 10 start button (bottom left). | # Press your Windows 10 start button (bottom left). | ||
# In the Windows 10 Start Menu, type: '''cmd''' | # In the Windows 10 Start Menu, type: '''cmd''' | ||
# Your Start Menu will show a black icon with "Command Prompt" next to it | # Your Start Menu will show a black icon with "Command Prompt" next to it. | ||
# In the right pane, click on "Run as administrator". A black window will pop up. | # In the right pane, click on "Run as administrator". A black window will pop up (see screen shot to the right). | ||
# In the | # In the black window, type: '''cscript slmgr.vbs -skms ickms.ic.ac.uk''' and press ENTER. Note the three spaces. Perhaps copy and paste it? | ||
# Then type: '''cscript slmgr.vbs -ato''' and press ENTER. Note the two spaces. | # Then type: '''cscript slmgr.vbs -ato''' and press ENTER. Note the two spaces. | ||
# The command will run and after a few seconds you should see that Windows is successfully activated. | # The command will run and after a few seconds you should see that Windows is successfully activated. | ||
# Close the black window. | # Close the black window. | ||
# Disconnect from | # Disconnect from Imperial College VPN. | ||
# Enjoy three more months of Windows 10. | # Enjoy three more months of Windows 10. | ||
== How to stop Windows 10 from saying you have no network, when you know you have == | == How to stop Windows 10 from saying you have no network, when you know you have == | ||
Again the fix is simple when you know how. The problem happens with recent versions of Windows 10 during mid 2020. | Again the fix is simple when you know how. The problem happens with recent versions of Windows 10 during mid 2020. | ||
[[File:NetworkListService.png|thumb]] | |||
# Right-click your Windows menu button (bottom left). | # Right-click your Windows menu button (bottom left). | ||
| Line 30: | Line 29: | ||
# Right-click on it and select '''Properties'''. | # Right-click on it and select '''Properties'''. | ||
# Ensure that it says '''Startup Type: Automatic (Delayed Start)''' and press '''Apply'''. | # Ensure that it says '''Startup Type: Automatic (Delayed Start)''' and press '''Apply'''. | ||
# Ensure that the status says '''Running'''. | # Ensure that the status says '''Running'''. If it isn't press '''Start'''. | ||
Latest revision as of 09:23, 29 September 2020
Problems with Windows 10 activation
The copy of Windows 10 used at Imperial is a volume licence, which automatically activates everyone's licence on the Imperial network. The trouble with this approach is that devices not on the Imperial network, e.g. home workers in lockdown, aren't on the Imperial network and so the licence deactivates as a precaution after three months away.
As you can tell, this will start happening to everyone at Imperial three months after lockdown. Which is now (early July).
How to fix it and get Windows 10 activated again
The fix is very simple if you follow these steps exactly.
- Connect to the Imperial College VPN temporarily. https://www.imperial.ac.uk/admin-services/ict/self-service/connect-communicate/remote-access/virtual-private-network-vpn/
- Press your Windows 10 start button (bottom left).
- In the Windows 10 Start Menu, type: cmd
- Your Start Menu will show a black icon with "Command Prompt" next to it.
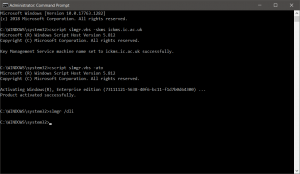
- In the right pane, click on "Run as administrator". A black window will pop up (see screen shot to the right).
- In the black window, type: cscript slmgr.vbs -skms ickms.ic.ac.uk and press ENTER. Note the three spaces. Perhaps copy and paste it?
- Then type: cscript slmgr.vbs -ato and press ENTER. Note the two spaces.
- The command will run and after a few seconds you should see that Windows is successfully activated.
- Close the black window.
- Disconnect from Imperial College VPN.
- Enjoy three more months of Windows 10.
How to stop Windows 10 from saying you have no network, when you know you have
Again the fix is simple when you know how. The problem happens with recent versions of Windows 10 during mid 2020.
- Right-click your Windows menu button (bottom left).
- Select Computer Management.
- Expand the Services and Applications tree at the bottom left of the window and select Services.
- In the right-hand pane, scroll down to Network List Service.
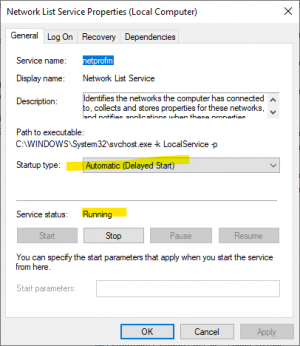
- Right-click on it and select Properties.
- Ensure that it says Startup Type: Automatic (Delayed Start) and press Apply.
- Ensure that the status says Running. If it isn't press Start.

