Printing: Difference between revisions
No edit summary |
|||
| (23 intermediate revisions by the same user not shown) | |||
| Line 1: | Line 1: | ||
= Printing at Imperial College = | = Printing at Imperial College = | ||
The print system is handled by HP themselves on behalf of the college. | The print system is handled by HP themselves on behalf of the college. You should follow [https://www.imperial.ac.uk/admin-services/ict/self-service/computers-printing/printing-photocopying-and-scanning/install-print-drivers/ Imperial's Mobile Print instructions]. This page is a guide to follow while you're working through the ICT Mobile Print page. | ||
== | |||
== Advice for when following the Mobile Print instrucions == | |||
Most of you are Windows users so I'll go over the key steps here. The main ICT instructions are quite good if you pay close attention, but they are from an old version of Windows 10. My page here is a supplement in case you get stuck. | |||
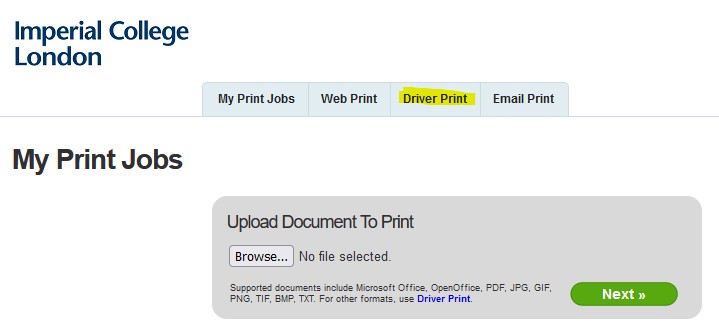
Log in to the [https://www.imperial.ac.uk/admin-services/ict/self-service/computers-printing/printing-photocopying-and-scanning/install-print-drivers/ Mobile Print site] with your Imperial credentials and then select '''Driver Print'''. Note that this page will only work on campus. | |||
[[File: | |||
[[file:mobileprint1.jpeg|border]] | |||
Now select your operating system with the large icons at the bottom (you are most likely Windows): | |||
If you are in the habit of using Remote Desktop and the VPN to connect to your DIDE PC, then there is a setting which you should | |||
[[File:Printer3.jpg | [[file:mobileprint2os.jpeg|border]] | ||
After this you get a couple of pages with only one option each (there used to be more). Go through these formalities and select the only option you have: | |||
[[File:Mobileprint3option.jpeg|border]] | |||
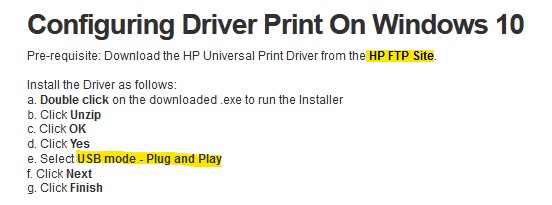
We now get to a mildly tricky bit as we have to download the actual HP software for talking to the printers. There is a handy link on the Mobile Print page to the [https://ftp.hp.com/pub/softlib/software13/COL40842/ds-99374-24/upd-pcl6-x64-7.0.1.24923.exe HP FTP site] so click on that to download it. | |||
[[File:Mobileprint4drivers.jpeg|border]] | |||
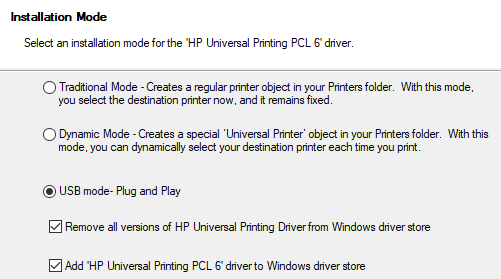
Once downloaded, double click on it to run it and press the '''Unzip''' button. Go through the installer as normal but make sure you select '''USB Mode - Plug and Play''' as your printer type. Leave the two text boxes at the bottom ticked. | |||
[[File:Mobileprint5usb.png|border]] | |||
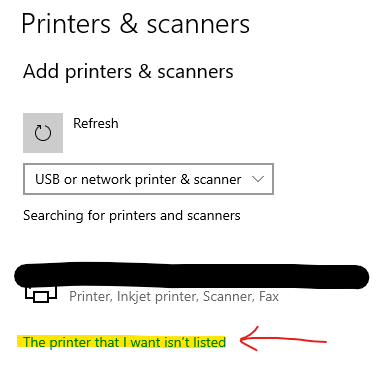
Now we get to add the actual print queue to your computer. From your start menu type '''printers''' and you'll see a menu item to add printers. Click on that and then select '''add a printer'''. It will have a think for a while and then show you some completely incorrect printers. As soon as you see the option '''my printer is not listed here''' click on that. | |||
[[File:Printernotlisted.png|border]] | |||
Now you can copy and paste the name of your print queue, which is listed in Step 4 of the Mobile Print page guide (below is a screenshot for your reference - you can't copy and paste this): | |||
[[File:Mobileprint6queue.jpeg|border]] | |||
You do need to copy and paste the whole address line, including the bit I've blurred out (I've blurred my exact address out or you would be printing as me with my print credit!). Remember that you're not copying and pasting this line, you're using the line from the Mobile Print web page! | |||
The rest of the ICT instructions should work ok, you merely have to select that you're adding an '''HP''' printer and you want to use '''HP Universal Printing PCL 6'''. There is no need to print a test page. | |||
== I don't have time for this and just want to print something! == | |||
If you're in a rush and have to print right now, then email your document to [mailto:print@imperial.ac.uk print@imperial.ac.uk] from your Imperial email address. You may then go to any swipe printer and collect your document. Remember to delete the email from your Sent Items folder afterwards or you may be wasting mailbox space. | |||
== It won't print in colour! == | |||
This is because the printers always autodetect as mono. Go in Printer properties -> Device Settings tab -> scroll down to Device Type and change it to say '''color'''. | |||
== Gotchas == | |||
If you are in the habit of using Remote Desktop and the VPN to connect to your DIDE PC, then there is a setting which you should '''untick''' in your Remote Desktop connection settings screen: | |||
[[File:Printer3.jpg]] | |||
Otherwise you'll end up with your office printers connected to your home computer and it has been known to mess things up. | |||
Latest revision as of 15:36, 27 January 2025
Printing at Imperial College
The print system is handled by HP themselves on behalf of the college. You should follow Imperial's Mobile Print instructions. This page is a guide to follow while you're working through the ICT Mobile Print page.
Advice for when following the Mobile Print instrucions
Most of you are Windows users so I'll go over the key steps here. The main ICT instructions are quite good if you pay close attention, but they are from an old version of Windows 10. My page here is a supplement in case you get stuck.
Log in to the Mobile Print site with your Imperial credentials and then select Driver Print. Note that this page will only work on campus.
Now select your operating system with the large icons at the bottom (you are most likely Windows):
After this you get a couple of pages with only one option each (there used to be more). Go through these formalities and select the only option you have:
We now get to a mildly tricky bit as we have to download the actual HP software for talking to the printers. There is a handy link on the Mobile Print page to the HP FTP site so click on that to download it.
Once downloaded, double click on it to run it and press the Unzip button. Go through the installer as normal but make sure you select USB Mode - Plug and Play as your printer type. Leave the two text boxes at the bottom ticked.
Now we get to add the actual print queue to your computer. From your start menu type printers and you'll see a menu item to add printers. Click on that and then select add a printer. It will have a think for a while and then show you some completely incorrect printers. As soon as you see the option my printer is not listed here click on that.
Now you can copy and paste the name of your print queue, which is listed in Step 4 of the Mobile Print page guide (below is a screenshot for your reference - you can't copy and paste this):
You do need to copy and paste the whole address line, including the bit I've blurred out (I've blurred my exact address out or you would be printing as me with my print credit!). Remember that you're not copying and pasting this line, you're using the line from the Mobile Print web page!
The rest of the ICT instructions should work ok, you merely have to select that you're adding an HP printer and you want to use HP Universal Printing PCL 6. There is no need to print a test page.
I don't have time for this and just want to print something!
If you're in a rush and have to print right now, then email your document to print@imperial.ac.uk from your Imperial email address. You may then go to any swipe printer and collect your document. Remember to delete the email from your Sent Items folder afterwards or you may be wasting mailbox space.
It won't print in colour!
This is because the printers always autodetect as mono. Go in Printer properties -> Device Settings tab -> scroll down to Device Type and change it to say color.
Gotchas
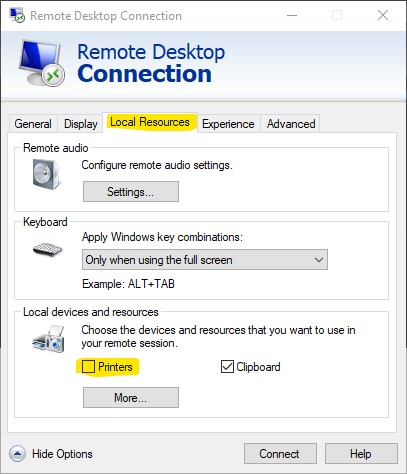
If you are in the habit of using Remote Desktop and the VPN to connect to your DIDE PC, then there is a setting which you should untick in your Remote Desktop connection settings screen:
Otherwise you'll end up with your office printers connected to your home computer and it has been known to mess things up.
