Barcode Epidemic: Difference between revisions
| (45 intermediate revisions by the same user not shown) | |||
| Line 1: | Line 1: | ||
[[File:infected.jpg|400px|right]] | |||
[[File:livenet.png|400px|right]] | |||
[[File:epigraph.png|400px|right]] | |||
= | = Introduction = | ||
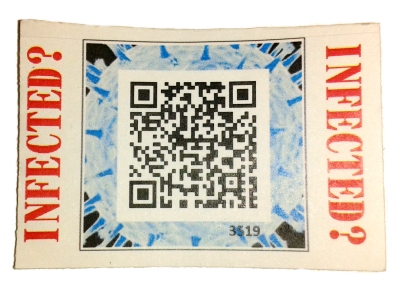
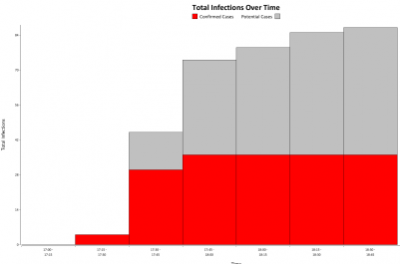
The Barcode Epidemic is a game we've used many times, either to help us have conversations about epidemics with the people, or to have a bit of epidemic-based fun at an evening party. Its first outing was in [[June 2013 - MRC Centenary, Science Museum]], although it is based on very successful previous events that basically did the same thing, but without using tablets and barcodes. It works well in groups of around 30+ people in a room, and also works well with a crowd passing through with a few minutes to spend with us. Usually we'd have 2 or 3 people with tablets playing the role of medics, or epidemic containment agents, perhaps in hazard suits. A person becomes infected by having a barcode (QR-code actually) give to them, and they are told to come to the medics with the red tablets to get the remedy. The barcodes get scanned, and the infector is sometimes given some kind of pleasant remedy for their infection. They also may be given a number of barcodes to give out, which represent them spreading their infection to others. Various epidemic statistics are displayed in real time as the epidemic progresses, and various conversations about epidemics might happen on the way. | |||
The game depends on a bit of technology; setup from scratch can take a bit of time, but once it's all done, it's just a few things to plug in. Particularly: it needs a wireless network (perhaps a private router, or an onsite wifi if you can depend on IP addresses not changing), a laptop running a web server and the software to display all the stats, and a number of tablets to do the scanning. | |||
= New Installation = | |||
If something has gone wrong, or the Barcode Epidemic needs setting up on new equipment, then the following should be everything you need to know. I'll use the current equipment to describe the process; steps will differ with different equipment obviously, but the principles should still work! | |||
== Platforms == | |||
We've tested the web server and main display on Windows and Mac, and got it all working. No reason I can see why it shouldn't work on Linux as well, but we haven't tested that. I've only tested the barcode printing code on Windows; it's all Java, but as it talks to printers, there's more possibility that something might not work. (That's quite a crude bit of software as you'll see...) | |||
= | == The Web Server == | ||
We need to run a lightweight HTTP server that supports PHP, and we'll use it to run a tiny website that supports the communication and data collection. The same platform supports the Herd Immunity app, so I'll put the setup for the common web-related parts on a separate page: [[Web Platform for MRC Outreach Events]]. This includes setting up the server software and hardware. | |||
== The Live Display App == | |||
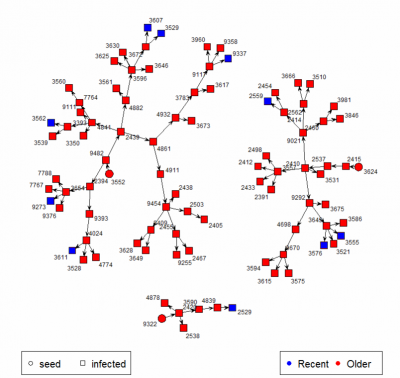
This is a small Java Application which can display a slideshow of graphs of the live epidemic data, interspaced perhaps with movies or images that might be interesting and attractive. One of the graphs is a network graph connecting people's contacts together, which relies on R. | |||
=== Install Prerequesties === | |||
* Java from [http://java.sun.com Oracle]. | |||
* R from [http://r-project.org R]. | |||
* Inside R, we need the '''statnet''' package, so install that in the R interface. | |||
=== Install and Configure the App === | |||
* Download the app - either [https://mrcdata.dide.ic.ac.uk/resources/bc_3.01_full.zip With Media] or [https://mrcdata.dide.ic.ac.uk/resources/bc_3.01_minimal.zip Without] - v 3.01, 26/01/2017. | |||
* Extract it anywhere you like. | |||
* The big zip contains sample movies and images in the '''media''' folder. You can delete what you don't want, but leave '''pause.png''' in there! | |||
* If you want to translate the text on the graphs into new languages, look in the '''lang.txt''' file for instructions. | |||
* To configure the app and the slideshow, look in '''script.txt''', which has instructions inline, but briefly: | |||
** Edit ''Language:'''''EN''' if you want a different language. The one you choose must have matching references in the '''lang.txt''' file. | |||
** Edit ''TimeZone:'''''GMT''' to match where you are, so that the graphs match the time the tablet thinks it is. GMT, or GMT+1, or any standard code is fine. | |||
** Edit ''WebFolder:'' to point to the folder where epi.csv and params.txt are found, where the Epi Webpage is served from. | |||
** Edit ''RScript:'' to point to where Rscript.exe is. (On Windows this is a full path, but Linux/Mac I think is just '''Rscript''') | |||
** ''RNetGraph:'' must point to the R script that creates the network graph - shouldn't need changing, unless you want to make different sorts of network graph... | |||
** Lastly, between the ''Script:'' and ''Loop'' lines, is the set of things that the live app will display. See the instructions in the file, but briefly: | |||
*** ''Movie["path/tomovie1.mp4","path/tomovie2.mp4"]'' - will play a one of these movies to completion on each cycle. The following cycle, it will play the next one... | |||
*** ''Image["path/toimage1.jpg","path/toimage2.png"]'' - similar, but it will display a static image. | |||
*** ''Wait 10'' - will wait 10 seconds. Important, as without it, it will jump to the next part instantly. | |||
* Lastly, to run the app, you need to type '''java BarcodeEpidemic''' while you're in the folder you extracted everything to. Or click on the '''run.bat''' or '''run.sh''' scripts if you're in a GUI. | |||
* The app is full screen - to close it: Windows, press ALT+F4 together. Mac: move the mouse to the top of the screen, and a menu bar should appear. | |||
== The tablet == | |||
If | * Talk to Wes or IT, to find the mystery unlock shape. | ||
* To set it up, you'll need to install two apps. | |||
* Connect it to a WiFi with internet access. If you're using the HP Slate 7, and you want to connect to the Imperial-WPA (or other Enterprise) network, then follow the special instructions on the [[HP Slate 7 2801]] page. | |||
* Use Google Play Store to install an app called '''Pic2Shop''' | |||
* While you're there, you might as well do an update. | |||
* Then install the Live Epidemic App by using Chrome, view this page, and download the app [https://mrcdata.dide.ic.ac.uk/resources/EpiScanner.apk Here]. Then click the various confirmations that you want to open it and install it. | |||
* If the EpiScanner app is already installed, then run it, click on the menu (the three dots in the top right), and check for updates. | |||
* Test by turning on the router, and starting up the web server laptop. Join the mrc_outbreaks network on the tablet. | |||
* And in Chrome, browse to http://192.168.2.2 or whatever the server's IP address is. (See the instructions about the [[Web Platform for MRC Outreach Events]]). You should get our MRC page - if not, check you're really connected to mrc_outbreaks on the tablet, then verify the router and web server are running ok, and the IP addresses match. | |||
* Run the Epi Scanner app, and from the menu (three dots), choose "Set Server URL". You'll want something like http://192.168.2.2/epi. | |||
* Try scanning a barcode. | |||
== The | == Making The Stickers == | ||
[[File:barcodeprinter.jpg|280px|right]] | |||
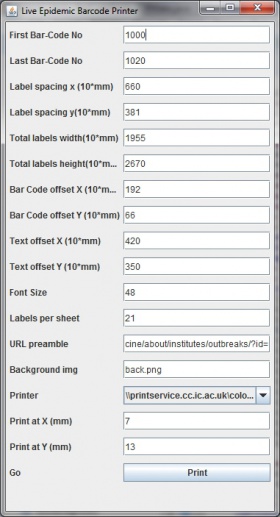
A very crude Java app for making the stickers is available [https://mrcdata.dide.ic.ac.uk/resources/BarCodePrinter1.0.zip Here]. Unzip it somewhere, and use '''run.bat''' or '''run.sh''' to run it. You'll get a screen full of parameters, and a go button. The labels we used for the first round were made by Niceday, 21 labels per sheet, 63.5mm x 38.1 mm, in boxes of 100 sheets. We found that the printers were not quite as precise as we wanted at printing exactly on the labels, so the parameters here are an example best fit. | |||
* First Bar-Code No is the serial number of the first barcode you want to print. | |||
* And Last Bar-Code No is obviously the last barcode you wan to print. | |||
* The Label Spacing (x and y) are distances from the left/top edge of one label, to the left/top edge of the next, in mm, multiplied by 10. | |||
** Horizontally, I made this 66.0mm - (not 63.5mm - there's a 2.5mm gap between labels), so the value is 660. | |||
** Vertically, I made it 38.5mm - the labels touch in the portrait direction. | |||
* Total labels width and height: basically assume labels are printable, non-labels are not, and measure the printable dimensions. | |||
** Horizontally, I made this 195.5mm (1955), which is 3*63.5 + 2*2.5 | |||
** Vertically, I made this 267mm - 38.1mm * 7 plus a bit - the 38.1mm must be slightly underestimated. | |||
* The Bar code offsets are the positions of the top-left corner of the barcode, relative to the label. 19.2mm and 6.6mm respectively (192, 66) worked for me. | |||
* And the text offset is the distance from the top-left of the label, to the bottom-left of the text, for the ID number to be plotted. I had to guess this a bit, but 42mm and 35mm were about right. | |||
* Font size is the size of the ID number. 48 is quite nice. | |||
* The labels per sheet is obviously, the number of labels per sheet. | |||
* The URL preamble is the bit before the ID number that will get made into the QR code. The epidemic needs the full URL to end with something like '''?id=1234''', but before that it doesn't care. You can therefore make the barcode point to any site you like that doesn't make me adding that tag on the end. | |||
* And the background image is the backdrop for the label. Mine was a 635x381 pixel image, with a border cut out - Thinking at 100dpi. | |||
* Next, choose the printer. | |||
* And lastly, set the number of millimetres (not mm*10 for some reason), for the position of the top-left of the first label, relative to the page. | |||
* And there's a print button to set things going. | |||
* Your settings will be saved in a text file called qrmake.ini. | |||
= Setting up for an event = | |||
So, assuming all the hardware and software is installed, here's how to run the event. | |||
==== | == Get the hardware ready == | ||
Assuming everything is ready and updated, so we don't need any internet access at this point. | |||
* Router on first. | |||
* Then turn on laptop, and join laptop to the private wifi. | |||
* | * If you're in Imperial, or somewhere the laptop has familiar wifi, it might be a good idea to forget those in case it decides to connect to them on a whim. | ||
* | * Turn tablets on, and connect them to the private wifi - again, you might want them to forget any other network they might be tempted towards. | ||
* | * Connect the laptop to the projector or display before running the live app - we don't want it changing resolutions mid flow. | ||
* | * And '''regarding TVs''', | ||
* ' | ** Make sure you've got the right cable, and test beforehand. For example, the TV in Pearl Liang, where we often have the short course social epidemic, doesn't support HDMI, even though it has the right ports, so use a VGA cable. | ||
** | ** Also remember that if you use the beast (HP Elitebook 8760w, it has an HP DisplayPort, not a HDMI port. | ||
== | == Setting the parameters == | ||
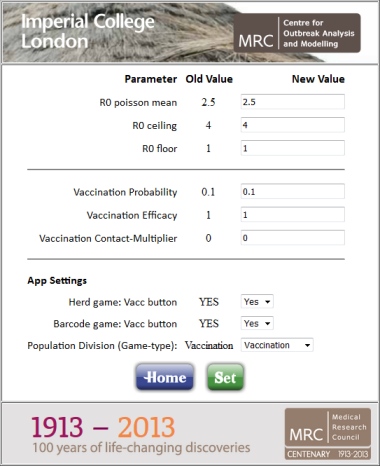
[[File: | [[File:params.jpg|380px|right]] | ||
The | * Browse to the Epi Platform page on whatever IP the laptop has got itself. (See earlier). | ||
* On the "Settings Params" page, here's what the parameters do. | |||
** The reproductive number. The number of new contacts each infector will make, is '''poisson distributed'''. | |||
*** First parameter is the '''mean''' | |||
*** Next is the '''ceiling''' and | |||
*** finally, the '''floor'''. | |||
** The vaccination part. If you want conversations about vaccination to be part of the game, then: | |||
*** '''Vaccination Probability''' is the probability of a person being vaccinated, if you ask the computer. (Which you can - see below) | |||
*** '''Vaccination Efficacy''' is the probability that someome who has been vaccinated gets some benefit from it. | |||
*** '''Vaccination Contact-Multipler''' is the effect of vaccination on the number of infections made, if a person is vaccinated, and it works for them. | |||
** Finally, the app settings. | |||
*** '''Vacc button''' - both the Herd Immunity Tablet app, and the Barcode Scanning app can display a '''Vaccination''' button, and when you tap it, it changes to ''Yes'' or ''No'' depending on the vaccination probability defined above. If you want that button visible in the app, then say YES. Otherwise, if either you don't want to talk about vaccination, or if you have some other way of defining whether people have been vaccinated, set it to NO, and the button will disappear from the tablets. | |||
*** '''Population Division''' or game-type. This option allows you to say, there are two types of people in the world, and when someone is infected, we ask them which kind they are. The effect of this is an extra pair of Scan/Type buttons appear on the android app, so you have one pair for each group of people. Also, some of the text labels on the analysis will change. The different game-types are: | |||
**** '''Departmental''' - in which we distinguish between members of department, and visitors. | |||
**** '''Gender''' - in which we distinguish between male and femals victims. | |||
**** '''Vaccination''' - in which we distinguish between those who were vaccinated, and those who were not. | |||
**** '''None''' - in which case all people are the same, you only get the one pair of buttons in the android app, and the analysis colours are less interesting. | |||
* So change all of these as you want, and then don't forget to click the '''Set''' button to save the changes. | |||
== | == Reset Previous Data == | ||
[[File: | [[File:reset.jpg|380px|right]] | ||
At some point, you'll need to clear the epidemic and start fresh. | |||
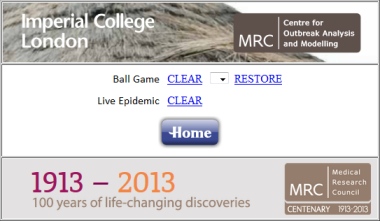
* Browse to the Epi Platform page again, and choose the "Reset" page. | |||
* | * The top entry is to do with the Herd Immunity game, so ignore that. | ||
* | * If you click the CLEAR button next to Live Epidemic, it will take a backup of whatever epidemic is currently running, and reset everything back to empty. | ||
* | * It might take a minute for all the changes to show up on the live display. | ||
* | |||
== | == Run the Epidemic == | ||
* | * Start the analysis app! (Run script, or java BarcodeEpidemic). | ||
* | * Seed the infection by giving someone in the crowd a barcode, and tell them to go to the medic with the tablet to get their cure. | ||
* | * The conversation with a new victim then goes along these lines. | ||
* | ** Hello. You seem to have been infected with a disease. Bad luck. | ||
* | ** For '''Gender''', '''Department''', or '''Vaccination''' games, observe, or discover the victim's gender, departmental, or vaccination status, so you can push the appropriate Scan button on the tablet. | ||
* | ** For the '''Vaccination''' game, it depends how you want the game to run, but you might push the '''Vaccinated?''' button, wave the tablet mystically at the victim, then reveal to them whether they are vaccinated or not. And then tap the appropriate Scan button. | ||
* | ** (For the '''None''' game, there's only one Scan button). | ||
* | ** So, somehow, you push the right scan button, and point the rear camera at the victim's barcode. Then keep their ticket to one side. | ||
* | ** The tablet will ask you to scan zero or more barcodes, one by one. Tap scan, scan the code. Tap scan, scan the code, etc. | ||
* | ** For the '''Vaccination''' game, the tablet at this point may have said, "You were vaccinated, but..." - in which case you can talk about vaccination efficacy, coverage, etc. | ||
** Give the new barcodes to the victim, tell them to go and spread the infection. | |||
** And some messages for the victim: | |||
*** They can look out for their number (which the scanner app shows, but is also printed on the barcode they gave you, which you kept to one side), and track their progress on the big screen. | |||
*** Tell them they are now immune, but to keep that a secret. If someone tries to infect them again, take the barcode, but you don't have to see the medic. | |||
*** Go and infect whoever you like, and tell them to come to the medics with the red tablet. | |||
** Remember to press the '''Send''' button at the end. | |||
* '''If you have problems scanning''' - the Type button lets you type in the number printed in a rather small typeface on the ticket. A torch/light can be a good idea. | |||
= | = Close-down = | ||
* | * Close the live app with ALT+F4 on Windows. On Mac, move the mouse to the top and the close button appears. Not sure on Linux - will find out. | ||
* Think about whether you want to Reset/Backup the epidemic. | |||
* Then power off things, and decide whether you want to charge them. | |||
* Drink tea. | |||
* | |||
* | |||
* | |||
Latest revision as of 12:45, 5 May 2017
Introduction
The Barcode Epidemic is a game we've used many times, either to help us have conversations about epidemics with the people, or to have a bit of epidemic-based fun at an evening party. Its first outing was in June 2013 - MRC Centenary, Science Museum, although it is based on very successful previous events that basically did the same thing, but without using tablets and barcodes. It works well in groups of around 30+ people in a room, and also works well with a crowd passing through with a few minutes to spend with us. Usually we'd have 2 or 3 people with tablets playing the role of medics, or epidemic containment agents, perhaps in hazard suits. A person becomes infected by having a barcode (QR-code actually) give to them, and they are told to come to the medics with the red tablets to get the remedy. The barcodes get scanned, and the infector is sometimes given some kind of pleasant remedy for their infection. They also may be given a number of barcodes to give out, which represent them spreading their infection to others. Various epidemic statistics are displayed in real time as the epidemic progresses, and various conversations about epidemics might happen on the way.
The game depends on a bit of technology; setup from scratch can take a bit of time, but once it's all done, it's just a few things to plug in. Particularly: it needs a wireless network (perhaps a private router, or an onsite wifi if you can depend on IP addresses not changing), a laptop running a web server and the software to display all the stats, and a number of tablets to do the scanning.
New Installation
If something has gone wrong, or the Barcode Epidemic needs setting up on new equipment, then the following should be everything you need to know. I'll use the current equipment to describe the process; steps will differ with different equipment obviously, but the principles should still work!
Platforms
We've tested the web server and main display on Windows and Mac, and got it all working. No reason I can see why it shouldn't work on Linux as well, but we haven't tested that. I've only tested the barcode printing code on Windows; it's all Java, but as it talks to printers, there's more possibility that something might not work. (That's quite a crude bit of software as you'll see...)
The Web Server
We need to run a lightweight HTTP server that supports PHP, and we'll use it to run a tiny website that supports the communication and data collection. The same platform supports the Herd Immunity app, so I'll put the setup for the common web-related parts on a separate page: Web Platform for MRC Outreach Events. This includes setting up the server software and hardware.
The Live Display App
This is a small Java Application which can display a slideshow of graphs of the live epidemic data, interspaced perhaps with movies or images that might be interesting and attractive. One of the graphs is a network graph connecting people's contacts together, which relies on R.
Install Prerequesties
- Java from Oracle.
- R from R.
- Inside R, we need the statnet package, so install that in the R interface.
Install and Configure the App
- Download the app - either With Media or Without - v 3.01, 26/01/2017.
- Extract it anywhere you like.
- The big zip contains sample movies and images in the media folder. You can delete what you don't want, but leave pause.png in there!
- If you want to translate the text on the graphs into new languages, look in the lang.txt file for instructions.
- To configure the app and the slideshow, look in script.txt, which has instructions inline, but briefly:
- Edit Language:EN if you want a different language. The one you choose must have matching references in the lang.txt file.
- Edit TimeZone:GMT to match where you are, so that the graphs match the time the tablet thinks it is. GMT, or GMT+1, or any standard code is fine.
- Edit WebFolder: to point to the folder where epi.csv and params.txt are found, where the Epi Webpage is served from.
- Edit RScript: to point to where Rscript.exe is. (On Windows this is a full path, but Linux/Mac I think is just Rscript)
- RNetGraph: must point to the R script that creates the network graph - shouldn't need changing, unless you want to make different sorts of network graph...
- Lastly, between the Script: and Loop lines, is the set of things that the live app will display. See the instructions in the file, but briefly:
- Movie["path/tomovie1.mp4","path/tomovie2.mp4"] - will play a one of these movies to completion on each cycle. The following cycle, it will play the next one...
- Image["path/toimage1.jpg","path/toimage2.png"] - similar, but it will display a static image.
- Wait 10 - will wait 10 seconds. Important, as without it, it will jump to the next part instantly.
- Lastly, to run the app, you need to type java BarcodeEpidemic while you're in the folder you extracted everything to. Or click on the run.bat or run.sh scripts if you're in a GUI.
- The app is full screen - to close it: Windows, press ALT+F4 together. Mac: move the mouse to the top of the screen, and a menu bar should appear.
The tablet
- Talk to Wes or IT, to find the mystery unlock shape.
- To set it up, you'll need to install two apps.
- Connect it to a WiFi with internet access. If you're using the HP Slate 7, and you want to connect to the Imperial-WPA (or other Enterprise) network, then follow the special instructions on the HP Slate 7 2801 page.
- Use Google Play Store to install an app called Pic2Shop
- While you're there, you might as well do an update.
- Then install the Live Epidemic App by using Chrome, view this page, and download the app Here. Then click the various confirmations that you want to open it and install it.
- If the EpiScanner app is already installed, then run it, click on the menu (the three dots in the top right), and check for updates.
- Test by turning on the router, and starting up the web server laptop. Join the mrc_outbreaks network on the tablet.
- And in Chrome, browse to http://192.168.2.2 or whatever the server's IP address is. (See the instructions about the Web Platform for MRC Outreach Events). You should get our MRC page - if not, check you're really connected to mrc_outbreaks on the tablet, then verify the router and web server are running ok, and the IP addresses match.
- Run the Epi Scanner app, and from the menu (three dots), choose "Set Server URL". You'll want something like http://192.168.2.2/epi.
- Try scanning a barcode.
Making The Stickers
A very crude Java app for making the stickers is available Here. Unzip it somewhere, and use run.bat or run.sh to run it. You'll get a screen full of parameters, and a go button. The labels we used for the first round were made by Niceday, 21 labels per sheet, 63.5mm x 38.1 mm, in boxes of 100 sheets. We found that the printers were not quite as precise as we wanted at printing exactly on the labels, so the parameters here are an example best fit.
- First Bar-Code No is the serial number of the first barcode you want to print.
- And Last Bar-Code No is obviously the last barcode you wan to print.
- The Label Spacing (x and y) are distances from the left/top edge of one label, to the left/top edge of the next, in mm, multiplied by 10.
- Horizontally, I made this 66.0mm - (not 63.5mm - there's a 2.5mm gap between labels), so the value is 660.
- Vertically, I made it 38.5mm - the labels touch in the portrait direction.
- Total labels width and height: basically assume labels are printable, non-labels are not, and measure the printable dimensions.
- Horizontally, I made this 195.5mm (1955), which is 3*63.5 + 2*2.5
- Vertically, I made this 267mm - 38.1mm * 7 plus a bit - the 38.1mm must be slightly underestimated.
- The Bar code offsets are the positions of the top-left corner of the barcode, relative to the label. 19.2mm and 6.6mm respectively (192, 66) worked for me.
- And the text offset is the distance from the top-left of the label, to the bottom-left of the text, for the ID number to be plotted. I had to guess this a bit, but 42mm and 35mm were about right.
- Font size is the size of the ID number. 48 is quite nice.
- The labels per sheet is obviously, the number of labels per sheet.
- The URL preamble is the bit before the ID number that will get made into the QR code. The epidemic needs the full URL to end with something like ?id=1234, but before that it doesn't care. You can therefore make the barcode point to any site you like that doesn't make me adding that tag on the end.
- And the background image is the backdrop for the label. Mine was a 635x381 pixel image, with a border cut out - Thinking at 100dpi.
- Next, choose the printer.
- And lastly, set the number of millimetres (not mm*10 for some reason), for the position of the top-left of the first label, relative to the page.
- And there's a print button to set things going.
- Your settings will be saved in a text file called qrmake.ini.
Setting up for an event
So, assuming all the hardware and software is installed, here's how to run the event.
Get the hardware ready
Assuming everything is ready and updated, so we don't need any internet access at this point.
- Router on first.
- Then turn on laptop, and join laptop to the private wifi.
- If you're in Imperial, or somewhere the laptop has familiar wifi, it might be a good idea to forget those in case it decides to connect to them on a whim.
- Turn tablets on, and connect them to the private wifi - again, you might want them to forget any other network they might be tempted towards.
- Connect the laptop to the projector or display before running the live app - we don't want it changing resolutions mid flow.
- And regarding TVs,
- Make sure you've got the right cable, and test beforehand. For example, the TV in Pearl Liang, where we often have the short course social epidemic, doesn't support HDMI, even though it has the right ports, so use a VGA cable.
- Also remember that if you use the beast (HP Elitebook 8760w, it has an HP DisplayPort, not a HDMI port.
Setting the parameters
- Browse to the Epi Platform page on whatever IP the laptop has got itself. (See earlier).
- On the "Settings Params" page, here's what the parameters do.
- The reproductive number. The number of new contacts each infector will make, is poisson distributed.
- First parameter is the mean
- Next is the ceiling and
- finally, the floor.
- The vaccination part. If you want conversations about vaccination to be part of the game, then:
- Vaccination Probability is the probability of a person being vaccinated, if you ask the computer. (Which you can - see below)
- Vaccination Efficacy is the probability that someome who has been vaccinated gets some benefit from it.
- Vaccination Contact-Multipler is the effect of vaccination on the number of infections made, if a person is vaccinated, and it works for them.
- Finally, the app settings.
- Vacc button - both the Herd Immunity Tablet app, and the Barcode Scanning app can display a Vaccination button, and when you tap it, it changes to Yes or No depending on the vaccination probability defined above. If you want that button visible in the app, then say YES. Otherwise, if either you don't want to talk about vaccination, or if you have some other way of defining whether people have been vaccinated, set it to NO, and the button will disappear from the tablets.
- Population Division or game-type. This option allows you to say, there are two types of people in the world, and when someone is infected, we ask them which kind they are. The effect of this is an extra pair of Scan/Type buttons appear on the android app, so you have one pair for each group of people. Also, some of the text labels on the analysis will change. The different game-types are:
- Departmental - in which we distinguish between members of department, and visitors.
- Gender - in which we distinguish between male and femals victims.
- Vaccination - in which we distinguish between those who were vaccinated, and those who were not.
- None - in which case all people are the same, you only get the one pair of buttons in the android app, and the analysis colours are less interesting.
- The reproductive number. The number of new contacts each infector will make, is poisson distributed.
- So change all of these as you want, and then don't forget to click the Set button to save the changes.
Reset Previous Data
At some point, you'll need to clear the epidemic and start fresh.
- Browse to the Epi Platform page again, and choose the "Reset" page.
- The top entry is to do with the Herd Immunity game, so ignore that.
- If you click the CLEAR button next to Live Epidemic, it will take a backup of whatever epidemic is currently running, and reset everything back to empty.
- It might take a minute for all the changes to show up on the live display.
Run the Epidemic
- Start the analysis app! (Run script, or java BarcodeEpidemic).
- Seed the infection by giving someone in the crowd a barcode, and tell them to go to the medic with the tablet to get their cure.
- The conversation with a new victim then goes along these lines.
- Hello. You seem to have been infected with a disease. Bad luck.
- For Gender, Department, or Vaccination games, observe, or discover the victim's gender, departmental, or vaccination status, so you can push the appropriate Scan button on the tablet.
- For the Vaccination game, it depends how you want the game to run, but you might push the Vaccinated? button, wave the tablet mystically at the victim, then reveal to them whether they are vaccinated or not. And then tap the appropriate Scan button.
- (For the None game, there's only one Scan button).
- So, somehow, you push the right scan button, and point the rear camera at the victim's barcode. Then keep their ticket to one side.
- The tablet will ask you to scan zero or more barcodes, one by one. Tap scan, scan the code. Tap scan, scan the code, etc.
- For the Vaccination game, the tablet at this point may have said, "You were vaccinated, but..." - in which case you can talk about vaccination efficacy, coverage, etc.
- Give the new barcodes to the victim, tell them to go and spread the infection.
- And some messages for the victim:
- They can look out for their number (which the scanner app shows, but is also printed on the barcode they gave you, which you kept to one side), and track their progress on the big screen.
- Tell them they are now immune, but to keep that a secret. If someone tries to infect them again, take the barcode, but you don't have to see the medic.
- Go and infect whoever you like, and tell them to come to the medics with the red tablet.
- Remember to press the Send button at the end.
- If you have problems scanning - the Type button lets you type in the number printed in a rather small typeface on the ticket. A torch/light can be a good idea.
Close-down
- Close the live app with ALT+F4 on Windows. On Mac, move the mouse to the top and the close button appears. Not sure on Linux - will find out.
- Think about whether you want to Reset/Backup the epidemic.
- Then power off things, and decide whether you want to charge them.
- Drink tea.
